
Lobby Manager Help File
LobbyAttendant™ Version 1.0
Lobby Manager Help Files
Contents
|
1.0 OVERVIEW 2.0 INSTALLING THE SOFTWARE 3.0 USING THE LOBBY MANAGER 4.0 LOBBY MANAGER TOOLKIT 5.0 LobbyAttendant™ INTERFACE 6.0 ABOUT ADVANCED KIOSKS |
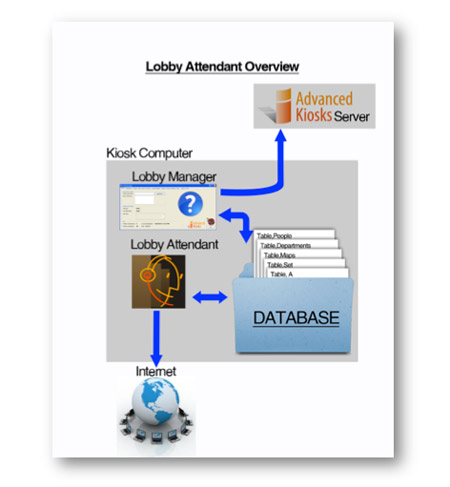
1.0 OVERVIEW
Thank you for purchasing the LobbyAttendant™ building entry kiosk software system. This program provides front-end directory and reception services through a display in a digital kiosk. There are two editions: Basic and Premium. Both editions can be configured for office buildings where there are many small business or a company or hospital facilities where there are many departments. These instructions are included in both Editions.
The program comes with two interfaces: 1) LobbyAttendant™, which serves users of the kiosk display, and 2) Lobby Manager, which provides the administration functions to configure the database and set the LobbyAttendant™ to how it will interact with the customer.
These instructions explain the program installation process and the screens and features of LobbyAttendant™ and the Lobby Manager. These help files are intended to provide non-technical instructions only. Technical issues should be addressed by contacting Customer Support at 603 865 1000 ex 110 or email to technical@AdvancedKiosks.com.
1.1 Reminder
The LobbyAttendant™ will perform only as well as the data that you enter in to the database. Your data is valuable, so remember to back it up. To back up your data see section on Remote Updating Tab, or Settings Tab.
1.2 Trade Mark
LobbyAttendant™ is a Registered Trade Mark of Advanced Kiosks.
1.3 Nuts and Bolts
The LobbyAttendant™ is a local application driven by a local Database. The control and configuration of the database is by the LobbyManager. The administrator will perform all the setup and maintenance in the LobbyManager. The results of the work done in the LobbyManager can be seen in the LobbyAttendant™.
2.0 INSTALLING THE SOFTWARE
Preparation: Depending on prerequisites already installed, the installation procedure will take approximately 15-60 minutes to complete. The person installing the system should be familiar Windows OS and software installation. Your system must have at least one gigabyte of RAM, be operating Windows XP or 7 Pro OS, and have at least a 1.6 Gigahertz processor. The video processor required may vary; however, AMD Radeon™ graphics card and NVidia GeForce® graphics card are both recommended. For easy installation, attach this document file to the administrator computer's desktop and simply click the required installation links.
2.1 Recommended Minimum System Requirements
- Windows XP or 7 OS
- 1 Gigabyte of Ram
- 5 Gigabyte Available HD Space
- 1.6 Gigabyte Processor or Higher
- Broadbancd Internet Connection
2.2 Load TeamViewer
In order to receive remote technical assistance, TeamViewer 6.0 must be installed. Skipping this step will not prevent LobbyAttendant™ Suite from installing. Follow these steps to install:
- Open Internet Explorer, then type http://www.teamviewer.com/en/index.asp.
- Click Start Full Version
- Click Run in the dialog box.
- Check Install in the TeamViewer 6 Setup box then click Next.
- Click Next.
- Click both boxes on License Agreement box then click Next.
- Check No then click Finish.
- Write down Your ID and Password for future reference. (Each time TeamViewer is opened this data should appear; however, it is best if you keep this information in a secure location.)
- Close the window.
Note: Microsoft .NET and MYSQL Server 2008 are prerequisites and will be installed by the following installation procedure. These combined files are approx. 250MB and may take a while to download. If you have a problem installing these prerequisites, go to www.microsoft.com/net or http://www.mysql.com/downloads/ and download directly. If left unattended, install operation may timeout and fail to complete.
2.3 LobbyAttendant™ Suite
Install the LobbyAttendant™ Suite using the following steps:
- Open an Internet Browser, then copy, or type:
http://www.advancedkiosks.com/apps/Lobby%20Attendant%20Suite/download/Lobby%20Attendant%20Suite-setup.exe into the web address field. - Once Lobby_Attendant_Suite-Setup.exe has downloaded, open the file (For Windows 7 and Vista OS, click Yes on the User Account Control popup window.).
- Welcome to Lobby Attendant Suite Setup Wizard. Click Next.

- The Wizard will automatically search for programs already installed and will list prerequisites still needed. Select Next to proceed with download.
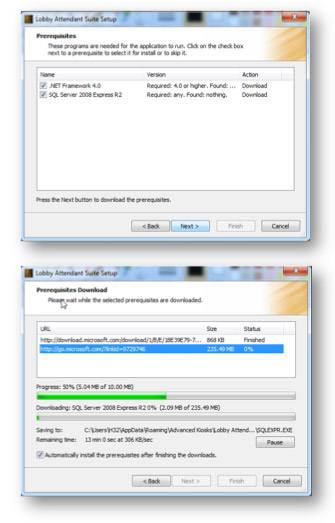
- Observe the download process. After downloads have finished a reboot is required. Operation will timeout and installation will not be completed if left unattended.
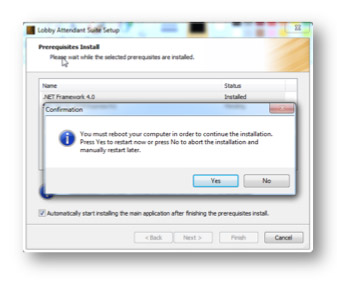
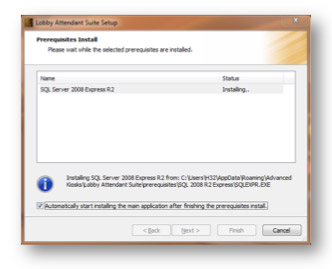
- Installation will continue after reboot. Microsoft.Net will install first. MySQL does not present a status bar, but the word “Installing” with animated " …". This process will take approximately 15 minutes.
 .
.
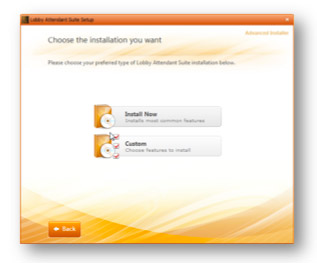
- After the prerequisites have finished installing, Lobby Attendant Suite Installer will continue. Select Install Now.
- Select Finish to complete installation. Lobby Attendant, Lobby Manager, Custom Template Builder, LobbyAttendant™ Owner’s Manual and Forbidden.txt Icons should all be located on the desktop. Tools folder will appear after the first run of Lobby Manager.
- Run Lobby Manager. Enter "admin" into the Password field in the Password Authentication window. Lobby Manager will open.
2.4 License Key
A License Key is required to run the program. Obtain a License Key using the following steps:
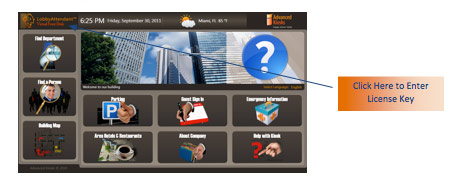
- Press the LobbyAttendant desktop icon on the Main Menu screen.
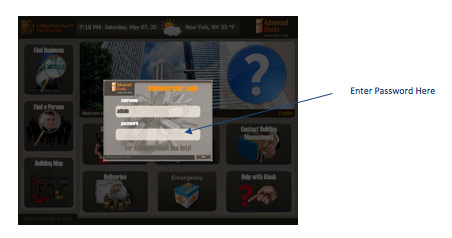
- Enter "admin" into the Password field.
- The Administration window appears.
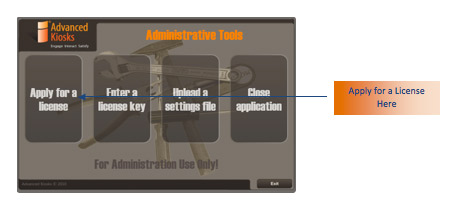
- Select Apply for a License.
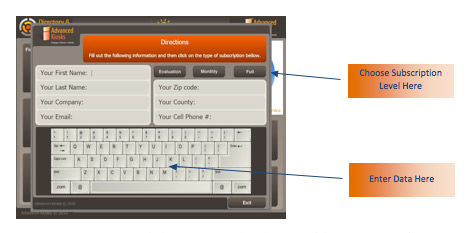
- The License Key keyboard appears – Fill out the required fields by pressing each field and using the keyboard to enter data.
- Select the appropriate license code:
- Evaluation – 30-day trial, full functions, license automatically expires following 30th day
- Monthly – Monthly subscription, full functions
- Basic – Monthly subscription, no phone, text and remote update functions
A License Key will be sent via email within 24 hours of request.
(NOTE: License Key must be entered into the system within 5 calendar days of receipt or system will lock.)When your License Key is received, follow these steps to initiate your subscription:
- Open the LobbyAttendant interface
- Click on the Advanced Kiosk logo.
- Enter "admin" into the password field.
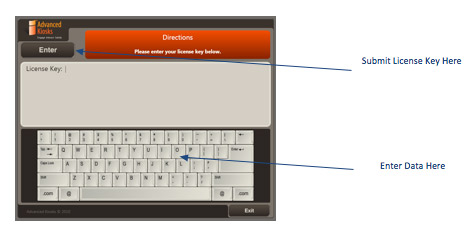
- The keyboard appears – Enter the License Key by pressing the License Key field and using the keyboard to enter data.
- LobbyAttendant and Lobby Manager are now functional.
LobbyAttendant™ is ready for you to use!
3.0 Using the Lobby Manager
The Lobby Manager provides an administrative interface which allows a user to manage the LobbyAttendant™ application from a remote computer or at the kiosk. Press or click on the LobbyManager desktop icon to get started. Access is password-protected through the use of an administration login window. The default password is "admin".
The Lobby Manager contains ten tabs that allow the user to assign an administrator, enter data and images to be displayed in the LobbyAttendant™, search visitor information, and manage settings. Users can also report a problem and request help through the Lobby Manager. Data can be imported from Excel spreadsheets and other files, and links to external websites are entered through the interface.
3.1 Home
The user enters the administrator name and notes (max 100 characters) under Administrator’s Detail. The Administration History displays the last administration login and most recent data download date. Notes that are entered under Administrator’s Detail are also listed here. Database Statistics displays the total number of departments and employees included in the database. There is a Help button (that appears on each tab) which links the user with the Advanced Kiosks website to search for assistance with the features of the Lobby Manager.
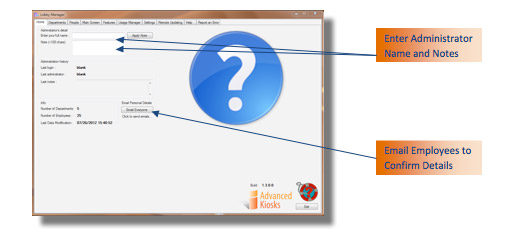
- 3.1.1 Administrator's Detail
To sign in as an administrator for the LobbyAttendant™ program, enter full name in the field and a note in the Note field, if necessary. NOTE: If there are multiple administrators responsible for operation, notes may be entered to communicate between administrators. Click Apply.
- 3.1.2 Administration History
A history of the most recent Lobby Manager use is displayed, including
- Last Login
- Last Administrator
- Most Recent Notes
Info Contains Database Statistics
The total number of Departments and Employees are displayed here. - 3.1.3 Email Personal Details
This will email each employee a copy of their employee details entered by the admin, allowing the employee to confirm accuracy.
- 3.1.4 Help Icon
Click on the Help icon to view a web-based Advanced Kiosks page with instructions about the Home screen for the Lobby Manager interface.
The Help feature appears on the following Lobby Manager screens:
- Home
- People
- Departments
- Main Screen
- Usage Manager
- Settings
- Features
- Report an Error
- Remote Updating
- 3.1.5 Exit
Click Exit to close the Lobby Manager interface.
3.2 Departments
- 3.2.1 Managing Departments
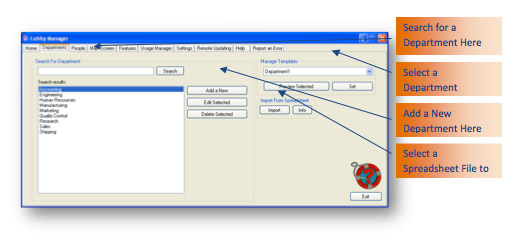
Department/Apartments/Businesses (you can choose how to profile this group…Departments, Apartments, or Businesses…under the settings tab). Details for these groups can be retrieved or entered through the Departments tab. The Search for Department function displays existing departments. The admin can add, modify or delete entries. The Manage Templates section allows you to preview and set the template that displays the Department information in LobbyAttendant™. Department’s data entered on an Excel spreadsheet can be imported into the LobbyAttendant™ interface through the Import from Spreadsheet feature.- 3.2.1.1 Search for Department
To search for a department in the directory database, enter the department name in the Search field and click Search. The results will be displayed in the Search Results field. To choose a selection in the list to edit or delete, highlight a name, then Edit Selected button.
- 3.2.1.2 Add a New Department
Click Add a New Department to add a department to the directory database.
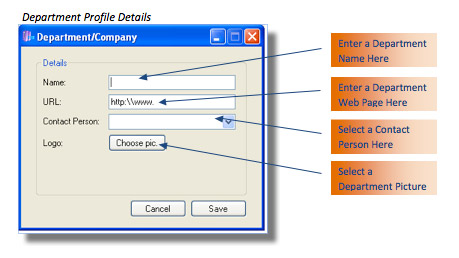
Enter department profile data into the directory database by filling the fields or clicking the buttons listed below:
- Name – Department or company name
- URL – Web page for department
- Contact Person– Primary contact for department. This person's contact information (call/txt numbers, map directions, URL) will represent the department. Until a person is assigned to this new department, the Contact Person drop down menu will remain empty and contact information will be unavailable in LobbyAttendant™.
*NOTE: If there is no designated contact person for a department, add a fictional employee with desired contact details to represent the department and then assign as Contact Person.
- Choose Pic – Image for department
- 3.2.1.4 Delete Department
Click Delete Selected Department to remove the selected profile from the directory database.
- 3.2.1.1 Search for Department
- 3.2.2 Manage Department Templates
The Lobby Manager includes templates to display department profile data. The user may choose a template to view by using the drop-down menu of available templates. Click the arrow to display the entire list.
Click Preview Selected.
To display the chosen template on the LobbyAttendant™ interface, click Set
- 3.2.3 Import Department from Spreadsheet
To import profile data from an MS Excel spreadsheet, click Import to choose an external file. Pick a file by highlighting the appropriate icon in the Windows Explorer window and click Open. Click Cancel to close the window without importing the data.
Click Info to view a sample spreadsheet.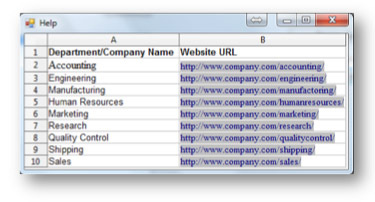
- 3.2.3.1 Import Departments Spreadsheet Instructions
- Department data must be entered into the database prior to importing an employee spreadsheet.
- Select Import to open a Windows Explorer window.
- Select the Microsoft Excel department spreadsheet file to be imported. (File format must be .xls or .xlsx.)
- Click Open.
- The spreadsheet data will be loaded into the database. (The department name will appear in the Search Results field)
The following fields must be included in the imported spreadsheet:
- Department/Company Name
- URL address
- 3.2.4 Help Icon
Click on the Help icon to view a web-based Advanced Kiosks page with instructions about the Departments screen for the Lobby Manager interface.
- 3.2.5 Exit
Click Exit to close the Lobby Manager interface.
- 3.2.3.1 Import Departments Spreadsheet Instructions
3.3 People
- 3.3.1 Manage Contacts
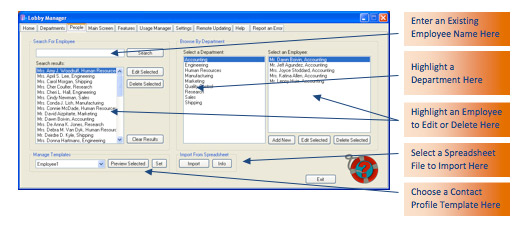
Employees / occupants information is entered through the People tab. The administrator can use “Search for Employee” to retrieve existing employee contact details. The admin has the option to preview the Contact Details screen for each employee, and can edit or delete the employee details.
The Browse by Department section displays existing departments and employees in the database. Employees can be added, edited or deleted here. The administrator can import data from an Excel spreadsheet under the Import from Spreadsheet section (corresponding Department information must already be loaded to the database). The Manage Employees Templates section contains pre-installed Contact Details screens that can be previewed and set to display on the LobbyAttendant™ interface.
- 3.3.1.1 Search For Employee
To search for an individual in the directory database, enter an employee name (first, last or both names) into the Search field and click Search. Results will be displayed in the Search Results field. To choose a selection in the list to preview, edit or delete the entry, click on the name.
- 3.3.1.2 Edit Selected Person
Click Edit Selected to make changes to the selected profile.
- 3.3.1.3 Delete Selected Person
Click Delete Selected to remove the selected profile from the directory database.
- 3.3.1.4 Clear Person Search Results
Click Clear Results to clear the Search Results field.
- 3.3.1.5 Browse for Person by Department
To view employee groups within a department, click on the department name. To choose a selection in the list to edit or delete, click on the employee name.
- 3.3.1.6 Click Edit Selected
Click Edit Selected to make changes to the selected profile.
- 3.3.1.7 Delete Selected
Click Delete Selected to remove the selected profile from the directory database.
- 3.3.1.8 Add New
Click Add New to add a new employee profile to the directory database. Employees must be assigned to a department.
- 3.3.19 Note
The first employee entered for each department will automatically be the contact person for that department. If data for multiple employees is imported the first record will become the contact person. The contact person may be changed by selecting the department in the Department tab and choosing Edit Department feature.
- 3.3.1.1 Search For Employee
- 3.3.2 Manage Contact Profile Templates
To apply a Contact Profile template to display in the LobbyAttendant™ interface, choose a template to view by using the drop-down menu of loaded templates. Click the arrow to display the entire list.
Click Preview Selected
To display the chosen template on the LobbyAttendant™ interface, click Set.
- 3.3.3 Employee Contact Profile Details
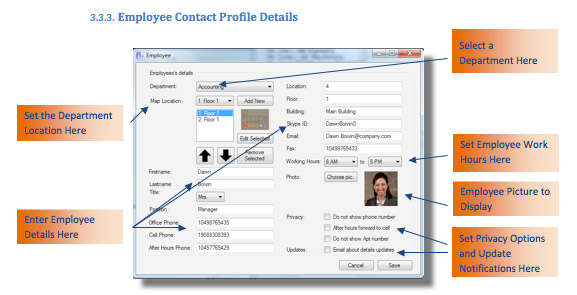
Enter employee profile data into the directory database by filling the fields listed below:
- Department – Choose from existing departments or enter a new department in the Departments Screen.
- Map Location– Choose a floor plan from the drop down menu (this menu is created from the maps added under the Settings tab).
- Add New – Select the map you’d like to add from the drop down menu. Multiple maps can be selected and added to this employee (multi-level building, alternate routes, etc.).
- Edit selected – Highlight one of the maps you’ve added and click Edit Selected to make changes. (See section 3.7.7)
- Remove Selected – Highlight one of the maps you’ve added and click Remove Selected to remove this map from the Employees Details.
Maps Displayed Order – Highlight a map you’ve added. Click the UP, or DOWN arrow to change the order this map will be displayed.
- First Name – Enter the first name
- Last Name – Enter the last name
- Title – Choose prefix title from drop down list
- Position – Enter the job title
- Office Phone – Enter an office phone number (no spaces {10498765435})
- Cell Phone – Enter a cell phone number (no spaces {19088308393})
- After Hours Phone – Enter an afterhours phone number (no spaces {10457765429})
- Location – Enter the Suite # or office name
- Floor – Enter the floor number
- Building – Enter the building name
- Skype ID – Enter the employee’s Skype account ID
- Email – Enter the email address
- Fax – Enter the fax number
- Working Hours – Enter the employee’s scheduled hours or the company’s hours of operation
- Picture – Load an employee picture by clicking Choose Pic. The user can choose a picture file from an external file location through the Windows Explorer window.
- Privacy – Check the box to apply
- Do not show phone number
- After hours forward to cell – Determined by Working Hours:
- Do not show Apt number
- Updates – Email about details updates. Check this box to email employee whenever details are updated.
Click Save to save the data as a profile.
Click Cancel to exit the window. Entered data will be lost.
- 3.3.4 Import From Spreadsheet
To import employee profile data from an MS Excel spreadsheet (see example below) click Import to select the file from an external location. Pick a file by highlighting the appropriate icon in the Explorer window and click Open. Click Cancel to close the window without importing the data.
Info
Click Info to view a sample spreadsheet.
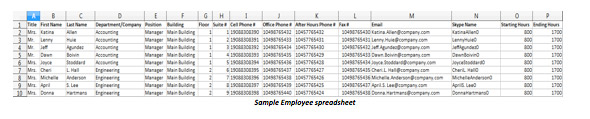
Import Employee Spreadsheet Instructions
- Department data must be entered into the database prior to importing an employee spreadsheet.
- Select Import to open a Windows Explorer window.
- Select the Microsoft Excel employee spreadsheet file to be imported. (File format must be .xls or .xlsx.)
- Click Open.
- The spreadsheet data will be loaded into the database. (Some data will appear in the Select an Employee field)
- The following fields must be included in the imported spreadsheet; however, a record may be imported with missing data.
- First Name
- Last Name
- Department/Company
- Position
- Building
- Floor
- Suite #
- Cell Phone*
- Office Phone*
- After Hours Phone*
- Fax #*
- Skype Name
- Starting Hours**
- Ending Hours**
*Communications data must contain 11 digits (e.g.16038651000)
**Data must be entered in military time format (e.g. 800 or 1700). No special characters or text.
- 3.3.5 Help Icon
Click on the Help icon to view a web-based Advanced Kiosks page with instructions about the People screen for the Lobby Manager interface.- 3.3.6 Exit
Click Exit to close the Lobby Manager interface.
3.4 Main Screen
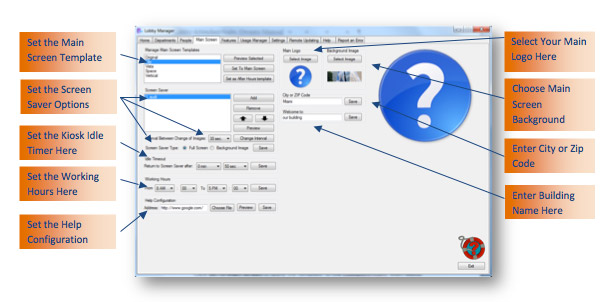
The administrator can manage the appearance of the LobbyAttendant Main Menu screen through the Main Screen tab.
- 3.4.1 Manage Main Screen Templates
To select a template to display on the LobbyAttendant Main Menu screen, click on a template name in the Manage Main Screen Templates field.
Click the Preview Selected to view the selection.
Click Set to Main Screen to apply the template to the LobbyAttendant Main Menu screen.
To display a template during non-operating hours, highlight the selected template and click Set as After Hours template. - 3.4.2 Main Logo
To display a specific logo image for the building on the Main Menu screen, click Select Image to open the Lobby Manager Tools folder. Open the Main Logo folder. Pick a file by highlighting the appropriate icon in the Windows Explorer window and click Open to set the image. Click Cancel to close the window without setting the image. - 3.4.3 Background Image
To display a specific building or background image on the Main Menu screen, click Select Image to open the Lobby Manager Tools folder. Open the Background Image folder. Pick a file by highlighting the appropriate icon in the Windows Explorer window and click Open to set the image. Click Cancel to close the window without setting the image. - 3.4.4 City or Zip Code
To display local weather for the building location on the Main Menu, Search Menu and Search Results Menu, enter the city or city, state or zip code into the Location field and click Save.
HINT: Enter a city name followed by state abbreviation to ensure correct data will be displayed. For example, enter “Portland, OR” or “Portland, ME”. - 3.4.5 Welcome To
To display the building address on the Main Menu screen, enter the physical address in the Address field and click Save. - 3.4.6 Working Hours
To display the hours of operation for the building, choose the opening and closing times by using the drop down lists and click Save. - 3.4.7 Screen Saver
The screen saver performs as a slide show.
3.4.7.1 Add
To add an image to your screen saver, click ADD to open the Lobby Manager Tools > Screen Savers folder. Pick a file by highlighting the appropriate image in the Windows Explorer window and click Open, then name image and press Enter. Click Cancel to close the window without setting the image. Repeat this process to add multiple images.
3.4.7.2 Remove
To remove an image from your screen saver, highlight the image name and click Remove.
3.4.7.3 Position
To change the order your images appear, highlight an image and click either the UP or DOWN arrow.
3.4.7.4 Preview
To preview your slideshow, click Preview. Click anywhere on the screen to exit preview mode.
3.4.7.5 Interval Between Change of Images
Select the time each image is displayed from the drop down menu. Click Change Interval to confirm.
3.4.7.6 Screen Saver Type
- Full Screen – Select this option for the screen saver to display over the entire screen.
- Background Select this option for the screen saver images to display as the background on the main screen.
- Save – Click to save changes
- 3.4.8 Idle Timeout
To set how long the LobbyAttendant™ remains idle on a popup, or sub directory before returning to the screen saver, or main screen, select a minute and second configuration from the dropdown menus. Click Save to confirm. Example: User searches directory for Mr. Smith and leaves kiosk without returning to the main page. After 50 seconds LobbyAttendant™ displays screen saver (if slides are provided) until user touches screen at which point the main screen is displayed.
- 3.4.9 Help Configuration
Configure this help feature to point towards your Companies URL, or a custom HTML. Enter a URL in the data field using the http://www. format, or click Choose File to open the Lobby Manager Tools > Links folder. Pick a file by highlighting the appropriate link in the Windows Explorer window and click Open. Click Cancel to close the window without setting the link.
- 3.4.10 Help Icon
Press the Help icon to view a web-based Advanced Kiosks page with instructions about the Main Menu screen for the Lobby Manager interface.
- 3.4.11 Exit
Click Exit to close the Lobby Manager interface.
3.5 Features
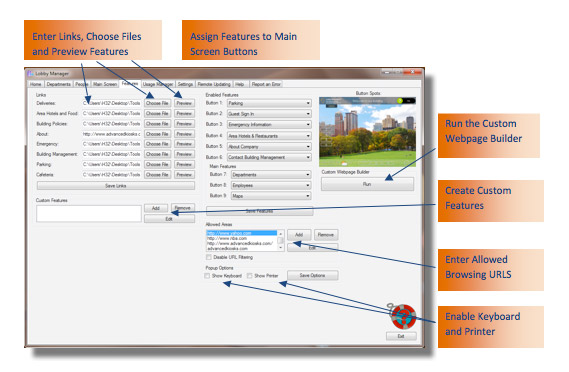
The administrator can set the links to display and the interface features in the LobbyAttendant™ screens. A link can target a webpage or a local file. To set a webpage to display, enter the page address in the field next to the guest service label. The user can preview a link to confirm the correct address or location. After a link has been created, it needs to be assigned to a Features Button to appear in LobbyAttendant™.
Guest information features are chosen by selecting Buttons 1-5, which will appear on the Main Menu screen. The actual position that the buttons appear on the main screen are specified in the screen image next to the button listing
To set a file to display, click Choose File. Select the file from the Links folder within the Tools library.
- 3.5.1 Links
To set the links that will appear when the following Main Menu buttons are pressed, enter a link in each field:- Deliveries – To set the Delivery link. For example, this link can display instructions for delivery personnel.
- Area Hotels and Food – To set the Area link. For example, this link can display a listing of area dining and hospitality establishments or a search page, such as Google® Maps.
- Building Policies – To set the Building Policies link. For example, this link can display a policy document or company website.
- About – This link could display information about your company, building, or tenants.
- Emergency – This link should display a list of local emergency departments (including, fire, rescue, police and poison control) with contact details or a municipal emergency services webpage.
- Building Management – This link should display building ownership and/or Management Company with contact details.
- Parking – This link should display local parking facility information. Including price and management company contact details will be helpful to users, if available.
- Cafeteria – This link should display the building's cafeteria location and menu.
- Guest Sign In – Guest sign in is a feature designed to allow users to check into your building by entering their first name, last name, company they represent (optional field) and taking a photo ID. Upon completion a guest name tag will print out to the operating systems default printer. A record of guests is recorded and access by administration under the Usage Manager (Section 3.6)
To set the link that will appear when the Main Screen Buttons are pressed, enter the link in each field:
Save Links Button
Click Save Links to set the selected links that will appear in the LobbyAttendant™ interface. - 3.5.2 Custom Features
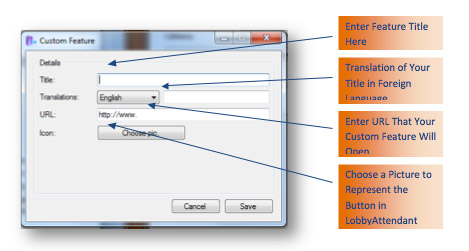
To create a custom feature that can be assigned to a button on the main screen, select Add.
Title – Enter the title of your custom feature (will appear on main screen button)
Translations – Enter the translation of your Title that will appear when the user changes languages. If no translations are entered, LobbyAttendant™ will display the Title in the language it was entered.
URL – Enter the URL in the http://www. format that will display when the assigned button is selected.
Icon – Choose a picture to represent the Button in LobbyAttendant™.
Save – Confirm custom feature settings
Remove – Highlight the Custom Feature to remove and click Remove.
Edit – To edit an existing Custom Feature, highlight the feature and click Edit. - 3.5.3 Assigning Features
Assign Links and Custom Features to the Buttons displayed on LobbyAttendant™’s main screen by selecting a feature from the drop down menu next to the corresponding button. Features that are already assigned to a Button will not appear on the drop down list. Custom Features will automatically appear on the drop down menus as they are added. Save Features to confirm assignments.
- 3.5.4 Main Features
LobbyAttendant™ has three main features: Departments, Employees, and Maps. If desired these main features can be treated like Buttons 1-6, but the corresponding databases will not work. For example, if you already have a building directory database displayed on your website it is possible to use that instead of populating LobbyManager’s database.
- 3.5.5 Allowed Areas
Add – To add a URL as an accepted site to browse, click Add. Enter the URL following http://www. format. Click Enter to save URL as an allowed area.
NOTE: .Example: If Button 5 is linked to Advanced Kiosks Press Releases https://advancedkiosks.com/tag/press-release and administration has only added https://advancedkiosks.com is added to Allowed Areas, users will be able to navigate to every page on Advanced Kiosks, not just the assigned Button.
Disable URL Filtering – Check this option box if you do NOT want to restrict the websites users can browse.
- 3.5.5.1 Forbidden.txt
Located on the desktop is a Forbidden.txt file. LobbyAttendant™ records all restricted URLS that users try to access. If you are added a URL to Allowed Areas, but LobbyAttendant™ prevents access, search the Forbidden.txt to find the exact URL that is being blocked, and then add that to your Allowed Areas.
- 3.5.5.1 Forbidden.txt
- 3.5.6 Popup Options
- 3.5.6.1 Show Keyboard
Check this option to enable onscreen keyboard input. A keypad icon will appear next to data fields. When the user selects the icon, an onscreen keyboard will appear. A keyboard icon also appears on the navigation bar which the user can select to bring up the onscreen keyboard.
- 3.5.6.2 Show Printer
Checking this option will allow users to print the page displayed in the popup screen. LobbyAttendant™ will print to the default printer assigned to the Operating System.
Save Options to confirm.
- 3.5.6.1 Show Keyboard
- 3.5.7 Custom Webpage Builder
Click Run to start the customized template builder for user-defined pages that will appear when selected buttons are pressed (e.g. parking).
Click Help on the builder window to view directions for use. When satisfied with the template, click the "x" button to close the window.
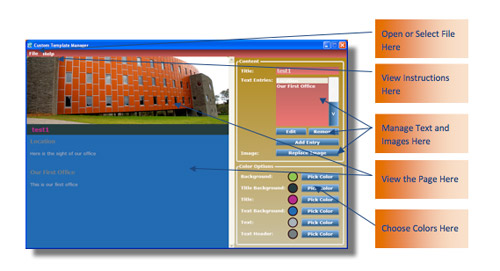
Once the template has been created a file will be saved on the administration computer desktop.Once the template has been saved, click Choose File for the related button that will display the web page and select the file to link to.
NOTE: The Custom Webpage builder is a separate program that must be installed prior to using this function. If the program is not installed, a warning box will appear with a link to our website download page.
- 3.5.8 Help Icon
Press the Help icon to view a web-based Advanced Kiosks page with instructions about the Main Menu screen for the Lobby Manager interface.
Exit
Click Exit to close the Lobby Manager interface.
3.6 Usage Manager
- 3.6.1 Visitor Data
Visitor data is managed through Usage Manager. The user can search for a specific visitor, delete a record or import visitor information. The data collected for registered visitors includes:
- First Name
- Last Name
- Company
- Phone
- Visitor's destination
- Date of Visit
- Photo image, if captured
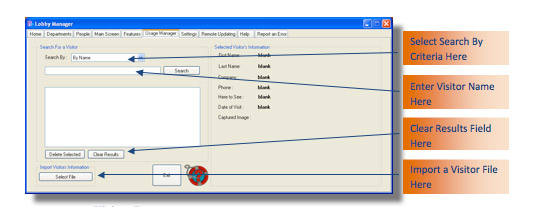
- 3.6.2 Search For a Visitor
- Search By Name
- Search By Department Visited
- Search By Date
- 3.6.3 Import Visitor Information
To import visitor data from an MS Excel spreadsheet, click Select File to choose the file from an external location. Open the Visitors folder. Pick a file by highlighting the appropriate icon in the Windows Explorer window and click Open. Click Cancel to close the window without importing the data.
- 3.6.4 Help Icon
Press the Help icon to view a web-based Advanced Kiosks page with instructions about the Main Menu screen for the Lobby Manager interface.
- 3.6.5 Exit
Click Exit to close the Lobby Manager interface.
To search for data entered by a visiting LobbyAttendant™ user, select the search criteria by using the pull down list of parameters. Available parameters include:
Enter the name (first, last or both names) in the Search field. Click Search.
A list of names will appear in the box below the Search field. To delete a visitor entry, highlight the name and click Delete Selected.
To clear the search results, click Clear Results.
3.7 Settings
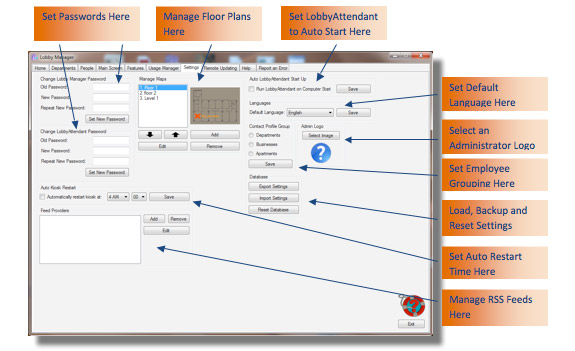
The Settings tab allows the administrator to modify passwords, manage maps, database files, administration logo, system functions, language options and other functions.
-
3.7.1 Change Lobby Manager Password
To change the administrator password for the Lobby Manager interface, enter the existing password in the Old Password field. Then enter a new password into the New Password field. Re-enter the new password into the Repeat New Password field. Click Set New Password.
- 3.7.2 Change LobbyAttendant™ Password
To set the initial password for remote access to the LobbyAttendant™ interface, enter the default password 'admin' into the Old Password field. Enter a new password in the New Password field. Enter the new password again in the Repeat New Password field. Click Set New Password to save the setting.
To change the administrator for the LobbyAttendant™ interface, enter the existing password in the Old Password field. Then enter a new password into the New Password field. Re-enter the new password into the Repeat New Password field. Click Set New Password. - 3.7.3 Manage Maps
Adding Maps – To add a map to the database directory, click Add to open the Lobby Manager Tools > Maps folder. Pick a file by highlighting the appropriate icon in the Windows Explorer window and click Open to set the image. Name the map and click Enter.
Edit Selected – Highlight one of the maps you’ve added and click Edit to make changes with the map editor.
Remove– Highlight one of the maps you’ve added and click Remove to remove this map from the database.
Maps Displayed Order – Highlight a map you’ve added. Click the UP, or DOWN arrow to change the order this map will be displayed.
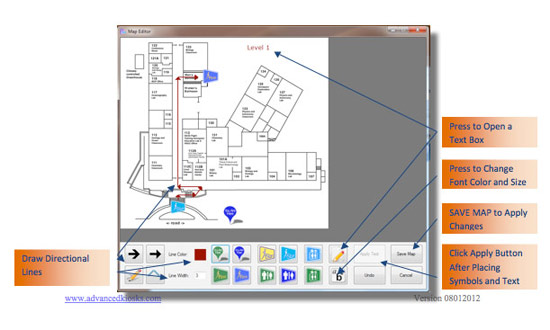
- 3.7.4 Map Editor
- 3.7.5 Languages
To set the default language that will appear on the LobbyAttendant™ interface, select a language from the list and click Save. If a LobbyAttendant™ user changes the language at the kiosk, the system will automatically return to the default language following a period of inactivity.
- 3.7.6 Database
Use the database options to backup, import and reset all of the settings made in Lobby Manager.
While LobbyAttendant™ is licensed to run on only one machine, LobbyManager may be used on multiple machines. This allows administration to configure the program from another location. To update the machine running LobbyAttendant™, Export Settings from administrator's machine. The file will be located in the Tools > Backup folder with a .bak extension. Copy this file to the LobbyAttendant™ machine’s Tools>Backup folder. Run the Lobby Manager application on that machine and Import Settings.- 3.7.6.1 Import Settings Data
To import data from an external file into the database directory, click Select File to choose the file from an external location. Pick a file by highlighting the appropriate icon in the Windows Explorer window and click Open. Click Cancel to close the window without importing the data.
- 3.7.6.2 Export Settings Data
To export data from the database directory to an external file, click Select File to choose a location to place the file in an external folder. Pick a location in the Windows Explorer window and click Save. Click Cancel to close the window without exporting the data.
- 3.7.6.3 Reset Database
To completely reset the database (erase ALL entered configurations and entries) click Reset Database. Confirm by clicking YES, cancel operation by clicking NO. Lobby Manager needs to be restarted after Database Reset.
- 3.7.6.1 Import Settings Data
- 3.7.7 Admin Logo
To set an administrator logo or image for the Lobby Manager Home tab, click Select Image to open the Windows Explorer window. Pick a file by highlighting the appropriate icon in the Windows Explorer window and click Open to set the image. Click Cancel to close the window without setting the image.
- 3.7.8 Contact Profile Group
This field will designate whether the database fields are displayed as Departments, Businesses, or Apartments. Check the box of the desired profile then click Save to confirm.
- 3.7.9 Help Icon
Press the Help icon to view a web-based Advanced Kiosks page with instructions about the Settings screen for the Lobby Manager interface.
- 3.7.10 Exit
Click Exit to close the Lobby Manager interface.
3.8 Remote Updating

The Remote Updating tab allows the administrator to download visitors' data and system settings and upload new settings from a remote location.
- 3.8.1 Connect to Remote Server
A Premium, full subscription LobbyAttendant™ program allows the administrator to update the database from a remote location. To access this feature, the administrator must enter credentials issued following the receipt of a license code into the Connect to Remote Server fields.
The most recent data upload is displayed under Settings Information. The most recent Visitors Information upload is displayed under Visitors Information. The status of an action is displayed under Status. The progress bar displays the progress of the action taken.
- 3.8.2 Actions
- 3.8.2.1 Download Visitors Data
Click Download Visitors Data to immediately retrieve data from the Visitors folder in the Lobby Manager Tools folder (see section 4.0).
- 3.8.2.2 Upload Settings
Click Upload Settings to send current LobbyAttendant™ program settings to the Settings folder in the Lobby Manager Tools folder.
- 3.8.2.3 During Normal Operation
LobbyAttendant™ program settings and visitor data will automatically synchronize daily with the most recent inputs provided.
- 3.8.2.1 Download Visitors Data
- 3.8.3 Manual Updating
While LobbyAttendant™ is licensed to run on only one machine, LobbyManager may be used on multiple machines. This allows administration to configure the program from another location. To update the machine running LobbyAttendant™, Export Settings from administrator's machine. The file will be located in the Tools > Backup folder with a .bak extension. Copy this file to the LobbyAttendant™ machine’s Tools>Backup folder. Run the Lobby Manager application on that machine and Import Settings.
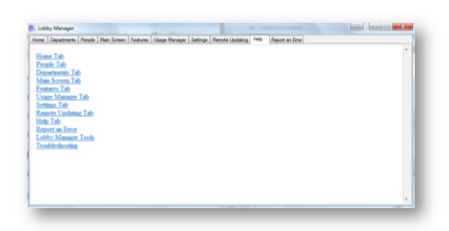
3.9 Help
Select the Help tab to view the entire library of Lobby Manager help topics. To view instructions for a specific function, choose the topic by clicking on the title.
3.10 Report an Error
The Report an Error tab allows the administrator to describe a problem with either the LobbyAttendant™ or Lobby Manager Interface. The user must include a Problem Summary, Name, Email Address and Phone Number when filing a problem report.
Describe the Problem
To report an error in the LobbyAttendant™ or Lobby Manager interfaces to Advanced Kiosks, enter the problem details in the Describe the Problem field. Provide as many details as possible, including the screen or tab location, keystroke or icon involved, results encountered and any other material information.Problem Summary
Provide a brief title for the problem encountered here.Your Name
Enter the administrator full name here.Your E-mail Address
Enter the administrator email address here.Your Phone Number
Enter the administrator phone number here.Click Report to send the problem details.

4.0 Lobby Manager Toolkit
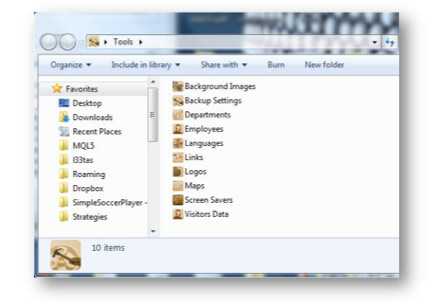
The LobbyAttendant™ system contains a generic information library, including tables, files and images. In order to customize the system, the administrator must load location-specific files into the Tools folder see below. The Tools folder contains the following subfolders to store files:
- Background Images
- Backup Settings
- Departments
- Employees
- Icons
- Languages
- Links
- Logos
- Maps
- Screen Savers
- Visitors Data
- Follow normal Windows file loading procedure to place files in the appropriate subfolders.
The Lobby Manager Toolkit stores images, data and settings for use in the Lobby Manager. The data stored in the Toolkit is displayed in the LobbyAttendant and Lobby Manager interfaces. The administrator may import files from other network locations or export files to the Lobby Manager. Acceptable file formats include:
- .xls
- .xlsx
- .doc
- .docx
- .jpg
- .jpeg
- .png
- .bmp
- .psd
- .data
- .html
- .htm
- .xml
4.1 Tools Library
-
4.1.1 Departments
This folder is used to store department data for each department/tenant company. File formats include:
- .xls
- .xlsx
- 4.1.2 Maps
This folder is used to store floor plan images for each department / tenant company. Image formats include:
- .jpg
- .jpeg
- .png
- .bmp
- 4.1.3 Screen Savers
This folder is used to store images to be displayed while the LobbyAttendant is in standby mode in this folder. Image formats include:
- .psd
- 4.1.4 Logos
This folder is used to store logo images in this folder. Image formats include:
- .jpg
- .peg
- .png
- .bmp
- 4.1.5 Contact Profile Images
This folder is used to store contact images and data that will be displayed in the Contact Profile screen in this folder. Image formats include:
- .jpg
- .jpeg
- .png
- .bmp
- 4.1.6 Backup Settings
This folder is used to store LobbyAttendant interface settings that can be imported to and from the Lobby Manager. File formats include:
- .data
- 4.1.7 Background Images
This folder is used to store building images that will display on the Main Menu screen in this folder. Image formats include:
- .jpg
- .jpeg
- .png
- .bmp
- 4.1.8 Visitors Data
This folder is used to store visitor data entered through the Guest Sign In feature in this folder. Image formats include:
- .jpeg
- .png
File formats include:
- .xls
- .xlsx
- 4.1.9 Links
This folder is used to store files to be displayed when features such as Area Hotels and Restaurants are accessed. File formats include:
- .html
- .htm
- 4.1.10 Languages
This folder is used to store language files. File formats include:
- .xml
- 4.1.11 Department Images
This folder is used to store images that represent departments within the company. Image formats include:
- .jpg
- .jpeg
- .png
- .bmp
- 4.1.12 Employees
This folder is used to store employee data for each department/company. File formats include:
- .xls
- .xlsx
5.0 LobbyAttendant™ Interface
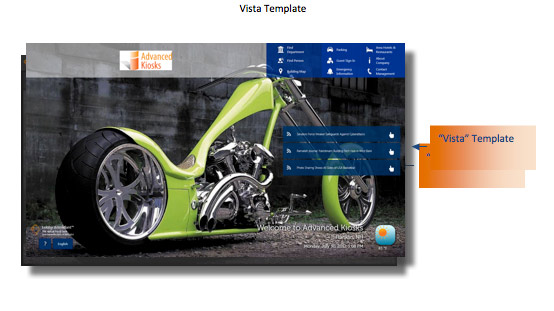
5.1 Main Screen Templates
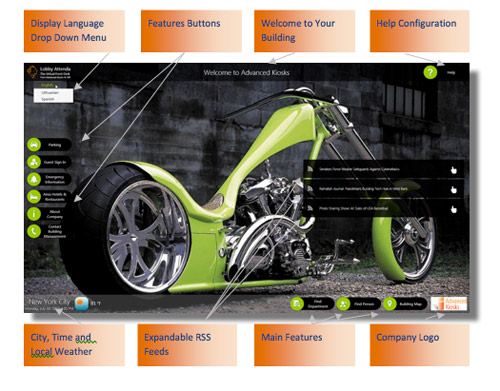
LobbyAttendant™ includes a selection of Main Screen Templates with both the basic and premium editions. Below is the City Template with RSS Feeds.

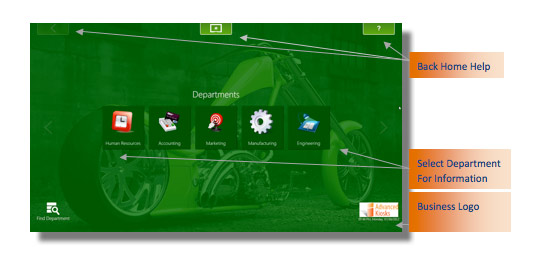
5.2 Departments Templates
The Department Template is viewed by users when pressing the Find a Department Button. The user is presented with a list of Departments. Selecting a department will provide them with the department details entered into the database by an administrator. Icons to view mapped directions, send message or to call that department are visible if applicable (contact features are available only with Premium edition).
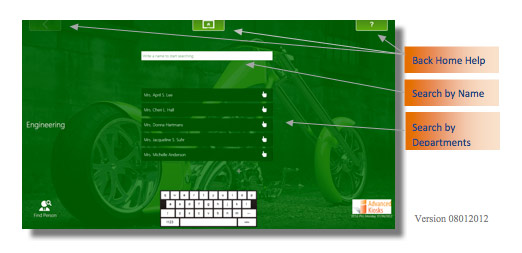
5.3 People Template
The People Template is viewed by users when pressing the Find Person button. The user is presented with the option to search by department, or conducting a search by entering a name. Selecting a person will provide them with the details entered into the database by an administrator. Icons to view mapped directions, send message or to call that person or department are visible if applicable (contact features are available only with Premium edition).
5.4 Viewable Maps
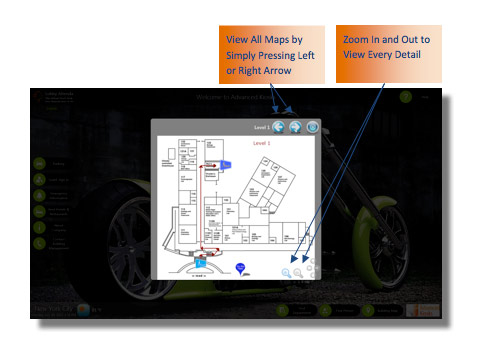
Users can view building maps by selecting the Maps button from the main screen. All the maps entered into the database by an administrator are viewable simply by navigating with the left and right arrows. A zoom feature is available on the bottom right of the map viewing window.
5.5 Calling Features (Premium Edition of LobbyAttendant™)
Calling features allow Lobby Users to connect directly with the Department, or Person they are here to see.
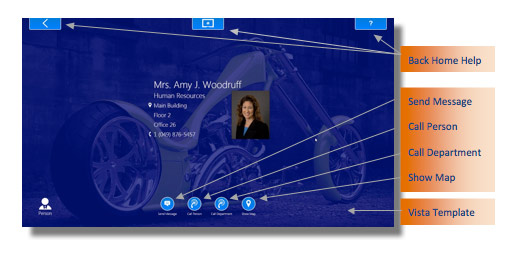
- 5.5.1 Communication Options – LobbyAttendant™ User
Once the LobbyAttendant™ User has searched for and located the party they wish to contact they can choose to Send Message, Call Person or Call Department.
- 5.5.1.1 Send Message
To send a message, press the Send Messagebutton. Enter your message in the txt box with the onscreen keyboard. Press Send Message to confirm.
- 5.5.1.2 Call Person
To call a Person, press the Call Person button. Enter your first name, last name, cell phone number (required) and who you represent. Press Call to confirm. Wait for LobbyAttendant™ response. If party is available call will either be connected to user’s cell phone, or a message will be displayed on screen informing you that the party will be right down, or is unavailable.
- 5.5.1.3 Call Department
To call a Department, press the Call Department button. Enter your first name, last name, cell phone number (required) and who you represent. Press Call to confirm. Wait for LobbyAttendant™ response. If department contact is available call will either be connected to user’s cell phone, or a message will be displayed on screen informing you that the party will be right down, or is unavailable.

- 5.5.1.1 Send Message
- 5.5.2 Communications Options - Person or Department
LobbyAttendant™ will ring the contact person’s phone with the following message and three options: “This is the Lobby Kiosk; Amy Woodruff is in the lobby. Press 0 to talk to them. Press 1 to tell them you will be right down in a few minutes to greet them. Press 2 to tell them you are busy or not in today. Press * to repeat these options. Press # to end.- 5.5.2.1 Option 0
LobbyAttendant™ will connect you to the cell phone number the kiosk user entered. This will allow both parties to communicate while making the LobbyAttendant™ available to the next user.
- 5.5.2.2 Option 1
LobbyAttendant™ will notify the user with an onscreen message telling them you will be right down to greet them.
- 5.5.2.3 Option 2
LobbyAttendant™ will notify the user with an onscreen message telling them you are busy or not in today.
- 5.5.2.1 Option 0
6.0 About Advanced Kiosks
Company History
6.1 Company History
Advanced Kiosks opened in 2004 as a division of H32 Design & Development LLC. The company designs, engineers and manufactures interactive, multimedia software and free-standing kiosks for a variety of purposes including:
- Self Service
- Event Registration
- Building Directory & Wayfinder
- Education
- Retail Sales
- Banking
- Travel Services
- Surveys
- Training
- Advertising
- Entertainment